I’ve been writing some code in Rust recently, and I thought it would be cool if I could take some of this Rust code and provide it as a native extension that I can call from Python. It turns out there are some amazing tools like PyO3 that make it easy to write fully featured Python extensions in Rust, with considerably less effort than writing a CPython extension manually.
To test out PyO3 I wrote a small Python extension in Rust, and I thought I would share some of the tips and tricks I encountered in getting this going. This post aims to serve as a quick tutorial showing how to write extensions in Rust, talking about why you might want to use something more powerful than just exposing a C library called using CFFI, and how PyO3 lets you write Python aware extensions in Rust. This post also goes through how to integrate your Rust code with setuptools, and automatically building Python wheels for your Rust extension using cibuildwheel.
The end result is a Python extension that can be distributed through PyPI without even usually requiring a rust compiler on the machine it will be installed on!
All the code for this post is up on my GitHub account.
Rust Extensions with CFFI
For the examples in this post, I decided to wrap the cpp-demangle crate. This crate provides code to demangle C++ linker symbols into something that is human readable and lets you build tools like c++filt on top of it.
The nice thing about this library is that the API is pretty simple: we just to need to expose a function that takes a string as an input, and returns another string as an output and raise an exception if it fails.
To expose this code from Rust to Python, there are a couple of different approaches you could take. The simplest approach is to expose a C ABI from your Rust program:
extern crate libc;
extern crate cpp_demangle;

use libc::c_char;
use std::ffi::{CString, CStr};
use std::ptr;

#[no_mangle]
pub extern "C" fn demangle(input: *const c_char,
                           output: *mut c_char,
                           output_size: u32) -> i32 {
    // Copy input into a rust string
    let mangled = unsafe { CStr::from_ptr(input).to_bytes() };

    // Get the demangled output
    let demangled = match cpp_demangle::Symbol::new(&mangled[..]) {
        Ok(sym) => sym.to_string(),
        Err(_e) => return -1
    };

    // Check to see if we have enough storage in the output to hold the result
    if demangled.len() >= output_size as usize {
        return -2;
    }

    // convert to a null terminated string
    let demangled = CString::new(demangled).unwrap();

    // copy output back to caller
    unsafe {
        ptr::copy_nonoverlapping(demangled.as_ptr(), output, output_size as usize);
    }

    0
}
After compiling this into a shared library, you can call from python using the CFFI package:
from cffi import FFI

ffi = FFI()
ffi.cdef("int demangle(const char *, char *, int);")

lib = ffi.dlopen("./target/debug/deps/libc_cpp_demangle.dylib")

def demangle(mangled, result_size=128):
    result = ffi.new("char[%i]" % result_size)
    error_code = lib.demangle(mangled, result, result_size)

    if error_code == 0:
        return ffi.string(result)
    else:
        raise ValueError("failed to demangle (error_code=%i)" % error_code)

# prints b'mangled::foo(double)'
print(demangle(b"_ZN7mangled3fooEd"))
See this post for more complicated examples of using a C ABI and CFFI to call Rust code from Python. Another cool project to look at that helps build CFFI extensions in Rust is milksnake.
The big problem with this approach is that this limits us to a C ABI. Both Rust and Python are safe languages and requiring going to a lower level C library interface adds a lot of extra complexity and potential for errors. You can see this in the example above, you need to pass in an allocated character array with enough storage to hold the output - which seems needlessly primitive these days. Also having the extension just return a non-zero error code on failure loses some information on why this failed.
Writing Rust Extensions with PyO3

The PyO3 project aims to let you have full access to Python programs from Rust. This includes both embedding Python in Rust programs and creating Rust extensions that can be called from Python.
The approach is similar to the one taken by pybind11 for creating extensions in C++. In both cases, CPython extensions are written by using a library that acts like a domain specific language for building Python extensions. Each library will take the input code and compile it to a CPython extension with almost all the ordinary boilerplate taken care of for you. With PyO3 this is done by using procedural macros in Rust to convert the Rust code into a full-fledged CPython extension.
Using PyO3 to wrap the cpp_demangle crate looks like this:
#![feature(proc_macro, specialization)]

extern crate cpp_demangle;
extern crate pyo3;

use pyo3::py::modinit;
use pyo3::{Python, PyResult, PyModule, exc};

// This defines a python module. pyo3 will copy the rust doc comment
// below into a python docstring:

/// A package for demangling C++ linker symbols
///
/// This package provides python bindings for the rust crate
/// [cpp_demangle](http://github.com/gimli-rs/cpp_demangle) by building
/// a native Python extension using [PyO3](https://github.com/pyO3/pyO3)
///
/// Basic usage:
///
/// >>> demangle('_ZN7mangled3fooEd')
/// 'mangled::foo(double)'
#[modinit(cpp_demangle)]
fn init_mod(py: Python, m: &PyModule) -> PyResult<()> {

    // This adds a function to the python module:

    /// Demangles a mangled c++ linker symbol name and returns it as a string
    #[pyfn(m, "demangle")]
    fn demangle(mangled: String) -> PyResult< String > {
        match cpp_demangle::Symbol::new(&mangled[..]) {
            // Return the output as a string to Python
            Ok(sym) => Ok(sym.to_string()),

            // on an error, this will raise a python ValueError exception!
            Err(error) => return Err(exc::ValueError::new(error.to_string()))
        }
    }

    Ok(())
}
There are a couple of cool details that PyO3 is taking care of here. Its automatically converting Rust strings into Python strings, and will raise a ValueError in Python if the cpp_demangle crate returns an error. The various macros used will even take the rust documentation strings and map them to python docstrings - meaning that we can use doctest to test out that this all works like we expect from python!
Once this is all built, you can call this code directly from python, without having to mess around with CFFI:
# import our rust library, no need for cffi
from cpp_demangle import demangle

# run the demangle function, prints 'mangled::foo(double)'
print(demangle("_ZN7mangled3fooEd"))
Not only is the Rust code shorter and easier to manage, this approach completely removes needing CFFI bindings in Python. The PyO3 documentation has much more detail on how to expose more complicated types.
Integrating with setuptools with setuptools-rust
We don’t just want this code to build, we want to hook into the setuptools infrastructure so that it looks and feels like any other python package.
The setuptools-rust package lets us do this by adding support for building Rust extensions to setuptools. All that is required is adding a setuptools_rust extension to your setup.py file, which looks a little like this:
from setuptools import setup
from setuptools_rust import Binding, RustExtension

setup(name='cpp-demangle',
      version="0.0.1",
      rust_extensions=[RustExtension('cpp_demangle', 'Cargo.toml',  binding=Binding.PyO3)],
      test_suite="tests",
      zip_safe=False)
This will build the code referenced in your ‘Cargo.toml’ file, and automatically make it so that that setuptools will automatically build the extension and link against the appropriate version of python. It also handles installing the built location so that it can be imported from Python.
To build the Rust extension, you just need to specify a Cargo.toml specifying the dependencies:
[package]
name = "py_cpp_demangle"
version = "0.0.1"
authors = ["Ben Frederickson <github@benfrederickson.com>"]

[lib]
name = "py_cpp_demangle"
crate-type = ["cdylib"]

[dependencies]
cpp_demangle = "0.2.9"

[dependencies.pyo3]
version = "0.2"
features = ["extension-module"]
With these files in place, running python setup.py test from the same directory will build
the complete extension and run the unittests that are embedded in the docstrings in the rust code!
Building wheels using cibuildwheel
The downside of this approach so far is that it requires a nightly version of the rust compiler, since PyO3 is using Rust features that haven’t landed in Rust stable yet. It also requires the setuptools-rust package to be installed before calling setup.py. This means that distributing your extension isn’t nearly as easy as it should be: just distributing the source using a sdist package will require extra steps that people must follow to install.
Luckily there is a neat package cibuildwheel that can automatically build binary wheel versions for many different python versions on Linux, Mac OSX, and Windows - and push these wheels to PyPI on each release for you. With binary wheels pushed to PyPI the end users of the package won’t event need a rust compiler at all on their system, let alone the nightly version that PyO3 requires.
While cibuildwheel documentation is pretty good, getting this working properly with Rust extensions required some annoying fiddling with the travis and appveyor config files.
The wheels for OSX and Linux are built by cibuildwheel using Travis CI. Most of the config for
this is in the .travis.yml file which looks like:
language: python

matrix:
  include:
    - sudo: required
      services:
        - docker
      env:
        - CIBW_SKIP=*manylinux1_i686*
        - PIP=pip
        - PYTHON=python
    - sudo: required
      services:
        - docker
      env:
        - CIBW_SKIP=*manylinux1_x86_64*
        - PIP=pip
        - PYTHON=python
    - os: osx
      language: generic
      env:
        - PIP=pip2
        - PYTHON=python2

env:
  global:
    - TWINE_USERNAME=benfred
      # Note: TWINE_PASSWORD is set in Travis settings

script:
  - $PIP install cibuildwheel setuptools_rust
  - export CIBW_BEFORE_BUILD='pip install setuptools-rust && source {project}/ci/install_rust.sh'
  - export CIBW_SKIP=cp34-*\ $CIBW_SKIP
  - export CIBW_ENVIRONMENT='PATH="$HOME/rust/bin:$PATH"'
  - cibuildwheel --output-dir wheelhouse
  - |
    if [[ $TRAVIS_TAG ]]; then
      $PIP install twine
      $PYTHON -m twine upload wheelhouse/*.whl
    fi
I’ve added a little utility script to my project to install the nightly rust version for the Linux and OSX builds, and it is kicked off by setting the CIBW_BEFORE_BUILD environment variable appropriately. This can’t be directly added to the travis.yml file since the building the wheels happens in a couple of docker containers, so we need to instruct cibuildwheels to build and install rust inside the container. CIBW_BEFORE_BUILD also installs the setuptools-rust package for each version of python before it runs. PyO3 doesn’t support Python3.4 and earlier so I’m excluding that target using the CIBW_SKIP environment variable. I’m also using CIBW_SKIP to split building the 32bit / 64bit wheels into separate jobs on travis so that this all happens a little faster.
Likewise for Windows, we have to configure appveyor to build the project, which leads to an appveyor.yml file like:
environment:
  TWINE_USERNAME: benfred
  # Note: TWINE_PASSWORD is set in Appveyor settings
  matrix:
    # Nightly 64-bit MSVC
    - channel: nightly
      target: x86_64-pc-windows-msvc
      CIBW_SKIP: "*win32* cp27-* cp33-* cp34-*"
      CIBW_BEFORE_BUILD: pip install setuptools-rust
    # Nightly 32-bit MSVC
    - channel: nightly
      target: i686-pc-windows-msvc
      CIBW_SKIP: "*win_amd64* cp33-* cp34-*"
      CIBW_BEFORE_BUILD: pip install setuptools-rust


# from: https://github.com/starkat99/appveyor-rust/blob/master/appveyor.yml
install:
  - appveyor DownloadFile https://win.rustup.rs/ -FileName rustup-init.exe
  - rustup-init -yv --default-toolchain nightly --default-host %target%
  - set PATH=%PATH%;%USERPROFILE%\.cargo\bin
  - rustc -vV
  - cargo -vV
  - pip install cibuildwheel==0.9.1 setuptools_rust

build_script:
  - cibuildwheel --output-dir wheelhouse
  - >
    IF "%APPVEYOR_REPO_TAG%" == "true"
    (
    python -m pip install twine
    &&
    python -m twine upload 'wheelhouse/*.whl'
    )

artifacts:
  - path: "wheelhouse\\*.whl"
    name: Wheels
I failed to get the 64 bit wheel for Python2.7 to build on windows so I disabled that here (the 32 bit version builds fine).
The wheels will build on every commit, but will only get pushed to PyPI when you tag a new release in git. This requires you to enter the TWINE_PASSWORD into the appveyor and travis server configuration, and then create a new git tag to trigger the PyPI upload.
This can be done pretty easily with the bump2version package. Running this in a console at your project directory will bump the patch number, upload everything to GitHub and kick off a build on travis/appveyor that will upload the built wheels to PyPI:
# install the bump2version utility if you haven't already
pip install bump2version

# upgrades the patch version in setup.py, and tags the current git commit with the new version
bump2version --commit --tag patch setup.py

# pushs all the commits to github, and updates tags to kick off uploading to PyPI.
git push --follow-tags
After the build has finished, you should be able to head over to PyPI and see the list of uploaded wheels in the ‘Download Files’ section. There should be 19 different wheels with various combinations of Python 2.7/3.5/3.6/3.7 for Linux/Mac OSX/Windows operating systems for both 32/64 bit targets:
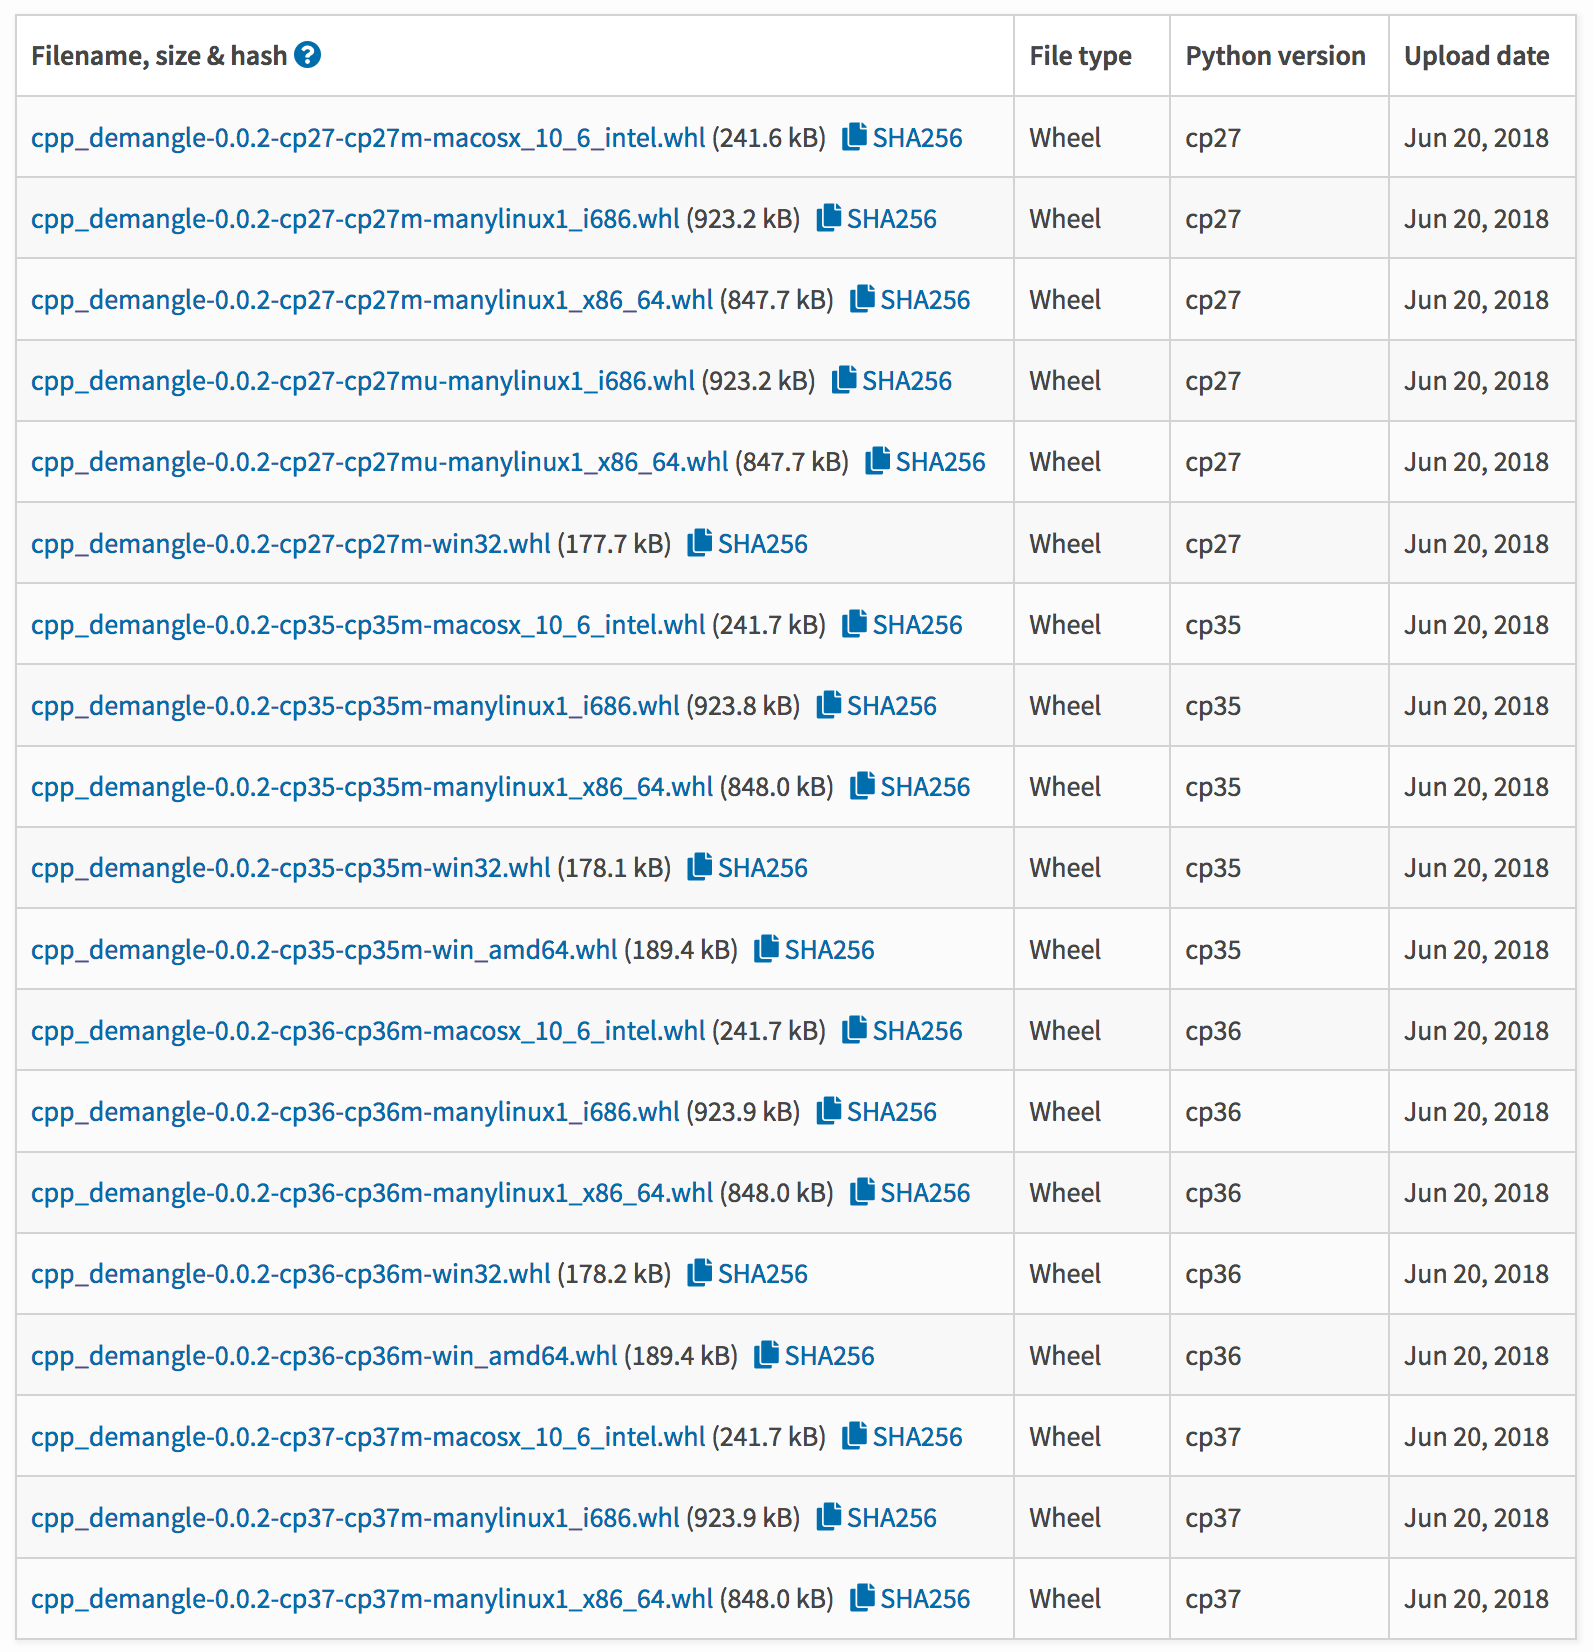
Now when people go pip install cpp_demangle (or whatever your package name is), they will pick up one of the prebuilt wheels - which will let them
use your code without even knowing that is built in Rust!
All the code for this post is up on my GitHub account as a sample project of getting this working.
Published on 21 June 2018
Get new posts by email!
Enter your email address to get an email whenever I write a new post: